What is authorization?
Authorization is the process of granting a connection or token access to Notion data. Internal connections use a static API token, personal access tokens use a user-scoped static API token, and public connections use the OAuth 2.0 protocol.Internal connection auth flow set-up
To use an internal connection, start by creating your connection in the Developer portal. The internal connection will be associated with the workspace of your choice. You are required to be a workspace owner to create a connection.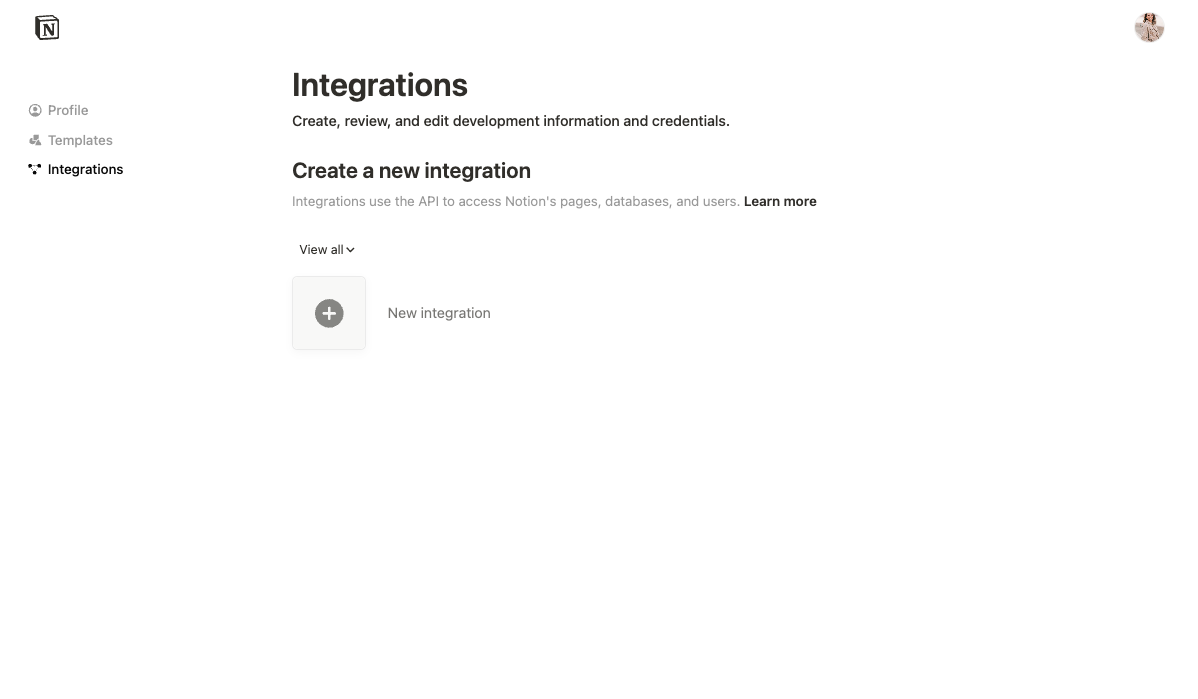
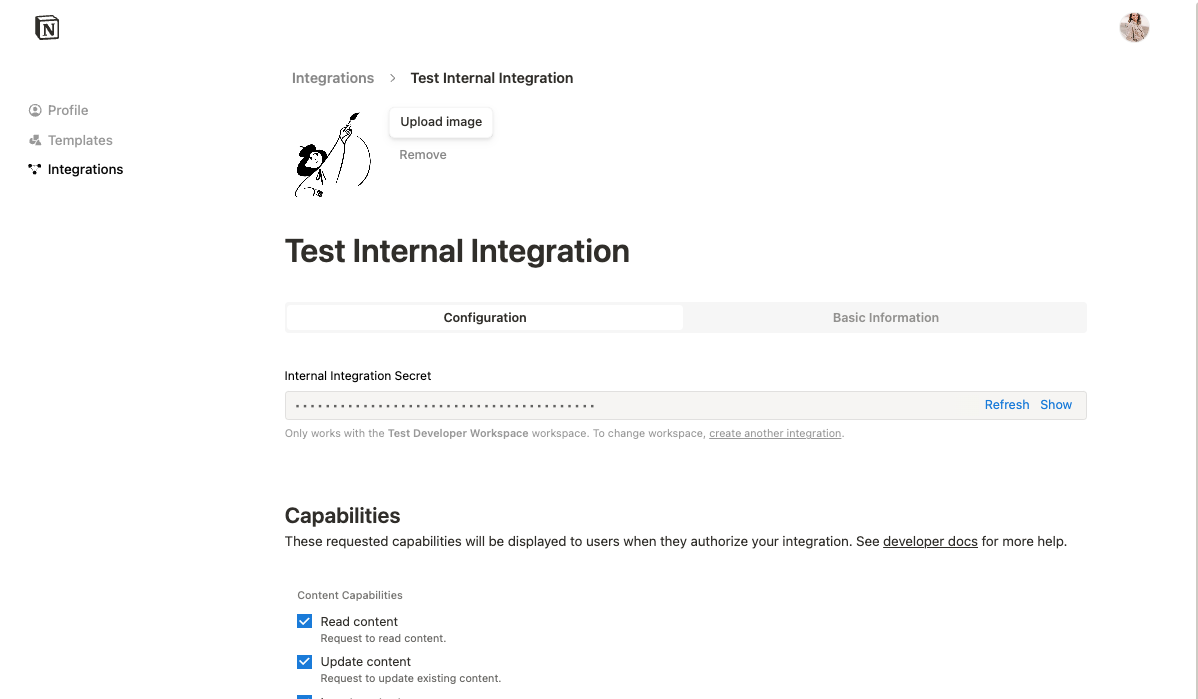
Configuration tab and retrieve the installation access token in this tab.
The installation access token will be used to authenticate REST API requests. The connection sends the same token in every API request.
Connection permissions
Before a connection can interact with your Notion workspace page(s), the page must be manually shared with the connection. To share a page with a connection, visit the page in your Notion workspace, click the ••• menu at the top right of a page, scroll down toAdd connections, and use the search bar to find and select the connection from the dropdown list.
Once the connection is shared, you can start making API requests. If the page is not shared, any API requests made will respond with an error.
Making API requests with an internal connection
Any time your connection interacts with your workspace, include the installation access token in theAuthorization header with every API request. However, if you are using Notion’s SDK for JavaScript to interact with the REST API, the token is set once when a client is initialized.
If you are not using the Notion SDK for JavaScript, also set the
Notion-Version and Content-type headers in all of your requests, like so:JSON
Personal access token auth flow set-up
Personal access tokens (PATs) are created directly by a Notion user in the Developer portal. There is no OAuth flow and no page picker. A PAT acts as the user who created it and uses that user’s permissions in the selected workspace. Use a PAT when a script, CLI workflow, Worker, or trusted tool should act as you. Use an internal connection for team-owned workspace automations, or a public connection when other Notion users need to install your app. PATs use the sameAuthorization header as other Notion API tokens:
Public connection auth flow set-up
A public connection can be installed in any Notion workspace within its installation scope — either any workspace, or a specific set chosen at creation time. Since a public connection is not tied to a single workspace with a single installation access token, public connections instead follow the OAuth 2.0 protocol to authorize a connection to interact with a workspace.How to make a public connection
Navigate to the Developer portal and create a new public connection. Fill out the form with your connection details, including your redirect URI(s) under the OAuth configuration section and the connection’s installation scope — either Any workspace or Selected workspaces only. This can’t be changed after creation. The redirect URI is the URI your users will be redirected to after authorizing the public connection. To learn more, read OAuth’s description of redirect URIs.Marketplace listing details (such as descriptions, categories, and images) are managed separately through the Listings section. Refer to the List on the Marketplace guide to learn more.
Public connection authorization overview
Once your connection has been made public, you can update your connection code to use the public auth flow. As an overview, the authorization flow includes the following steps. Each step will be described in more detail below.Navigate the user to the connection’s authorization URL. This URL is provided in the Developer portal.
After the user selects which workspace pages to share, Notion redirects the user to the connection’s redirect URI and includes a
code query parameter. The redirect URI is the one you specified in your Developer portal.Make a
POST request to create an access token, which exchanges the temporary code for an access token.Store the access token for future API requests. View the API reference docs to learn about available endpoints.
Step 1 - Navigate the user to the connection’s authorization URL
After creating a public connection in the Developer portal, access the connection’s secrets in the Configuration tab. Similarly to the internal connections, these values should be protected and should never be included in source code or version control.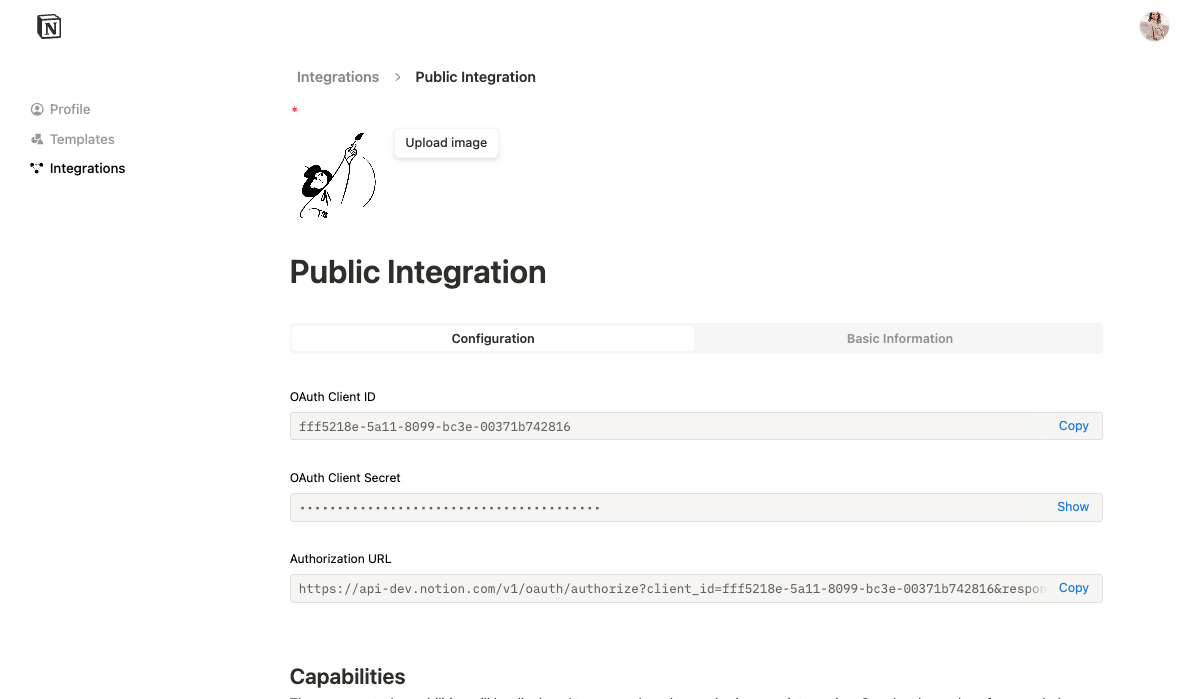
.env file using these secrets could look like this:
https://api.notion.com/v1/oauth/authorize and has the following parameters:
| Parameter | Description | Required |
|---|---|---|
client_id | An identifier for your connection, found in the connection settings. | ✅ |
redirect_uri | The URL where the user should return after granting access. | ✅ |
response_type | Always use code. | ✅ |
owner | Always use user. | ✅ |
state | If the user was in the middle of an interaction or operation, then this parameter can be used to restore state after the user returns. It can also be used to prevent CSRF attacks. |
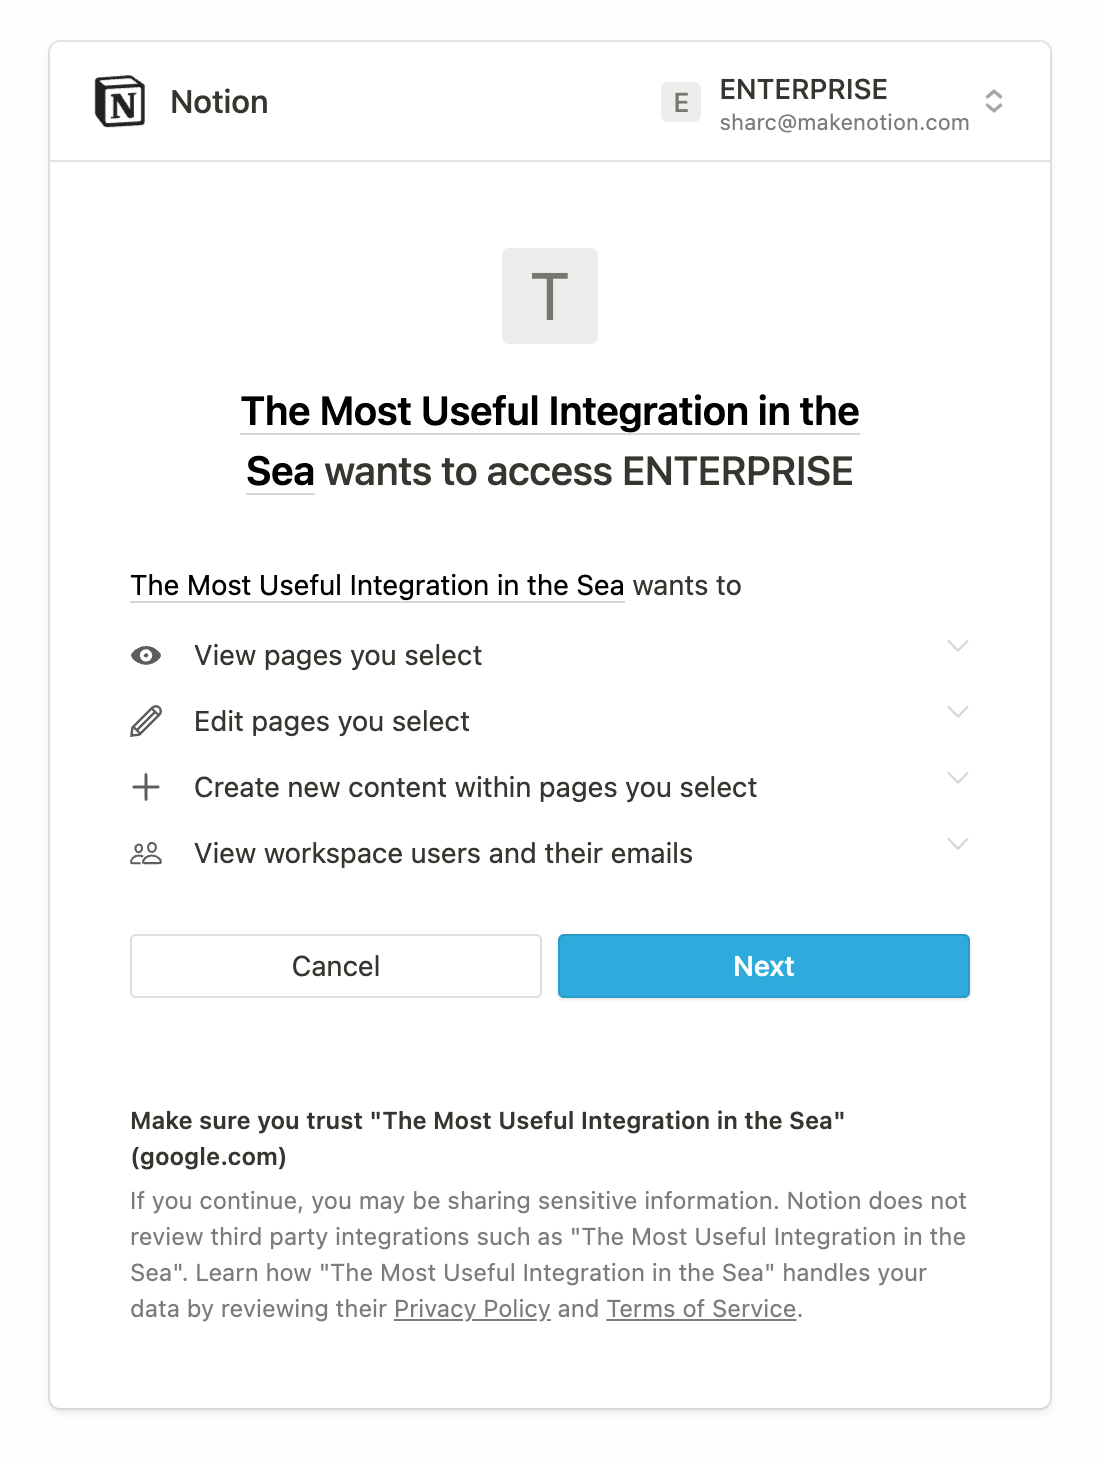
Prompt for a standard connection with no template option (Default)
In the standard connection permissions flow, a prompt describes the connection capabilities, presented to the user as what the connection would like to be able to do in the workspace. A user can either select pages to grant the connection access to, or cancel the request.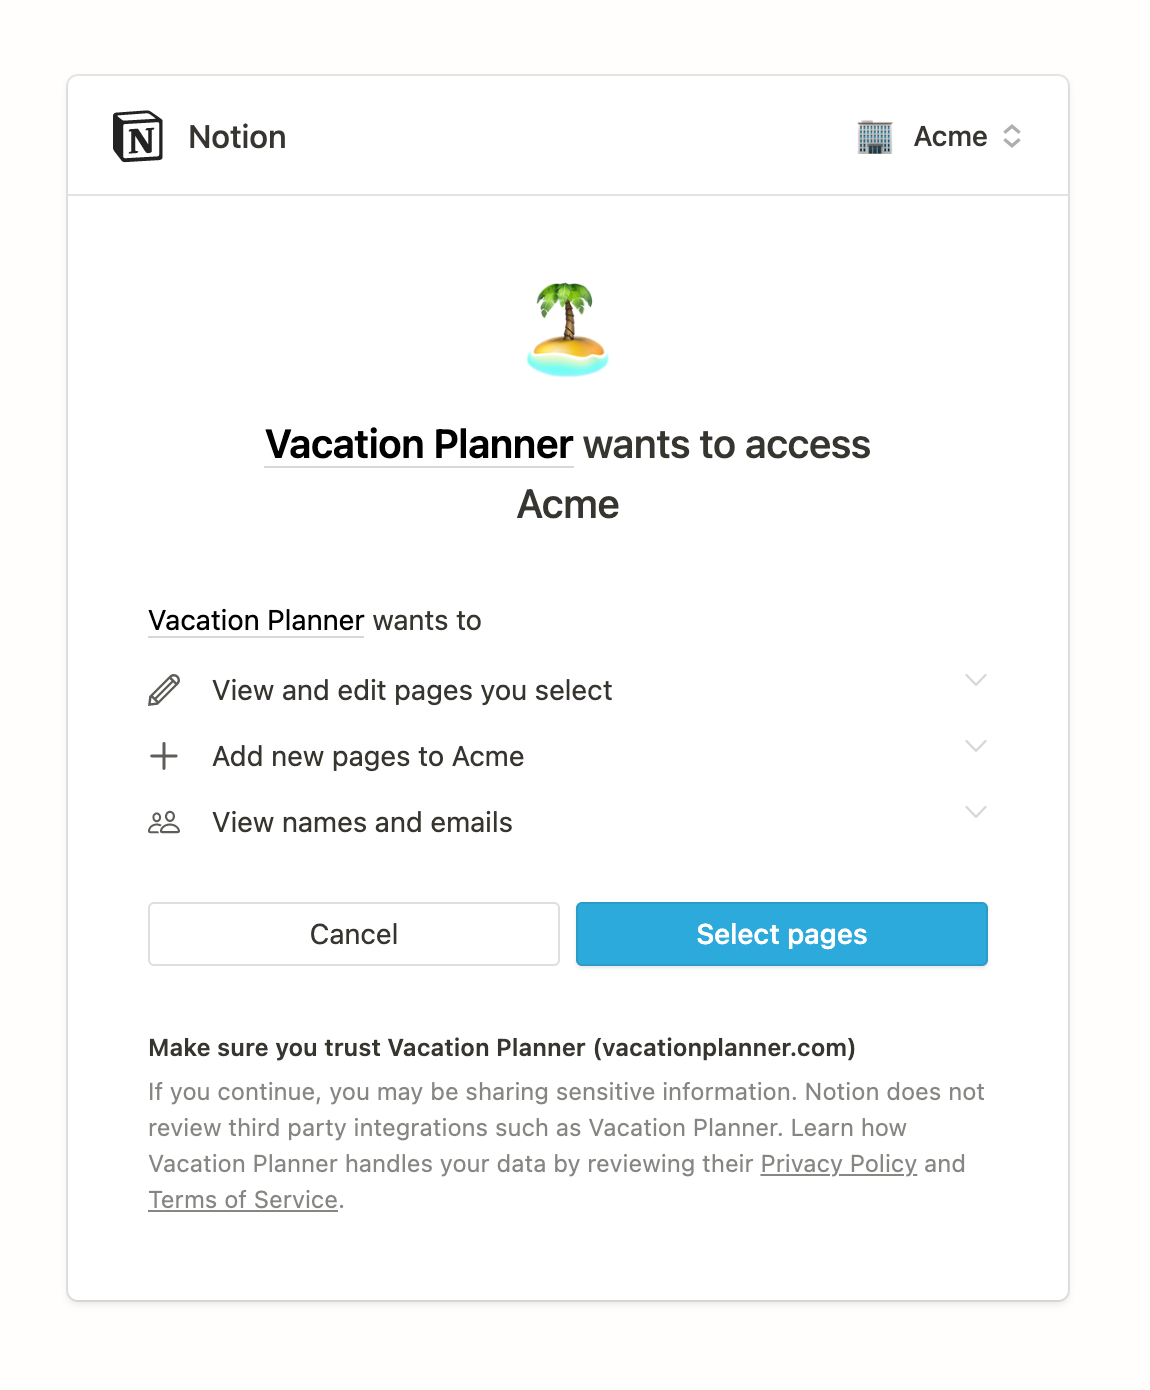
error query param added.
errorquery parameter to conditionally update your app’s state as needed.
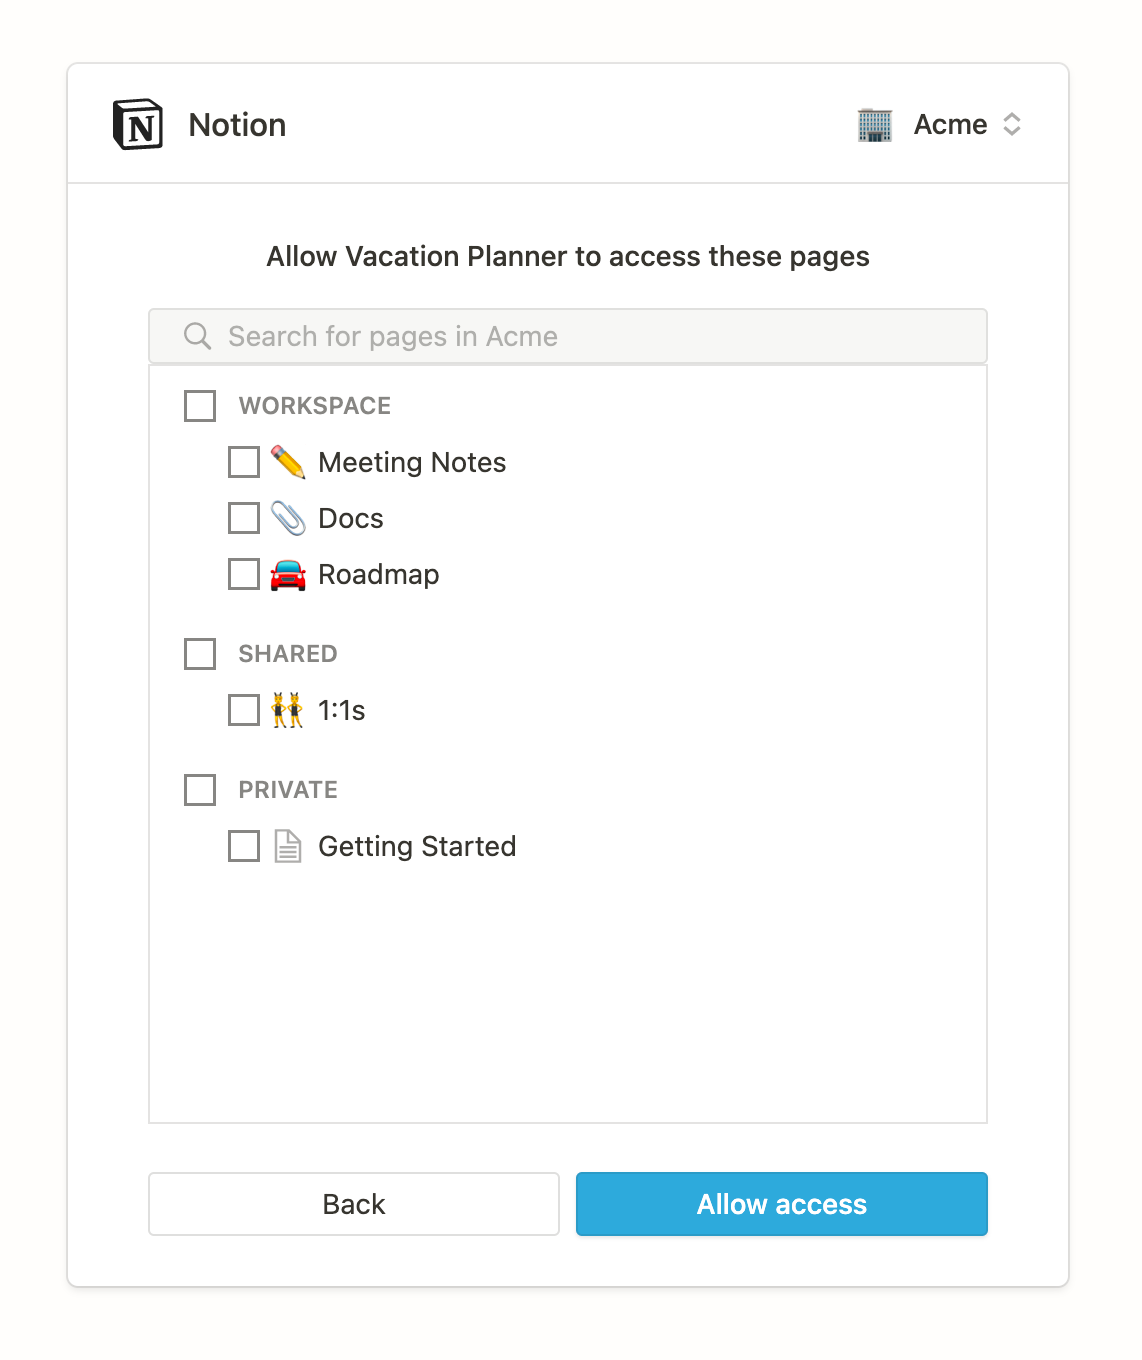
If the user opts to Select pages, then a page picker interface opens. A user can search for and select pages and databases to share with the connection from the page picker.
The page picker only displays pages or databases to which a user has full access, because a user needs full access to a resource in order to be able to share it with a connection.
Allow access, they are then redirected to the redirect_uri with a temporary authorization code. If the user denies access, they are redirected to the redirect_uri with an error query parameter.
If the user clicks Allow access and the rest of the auth flow is not completed, the connection will not have access to the pages that were selected.
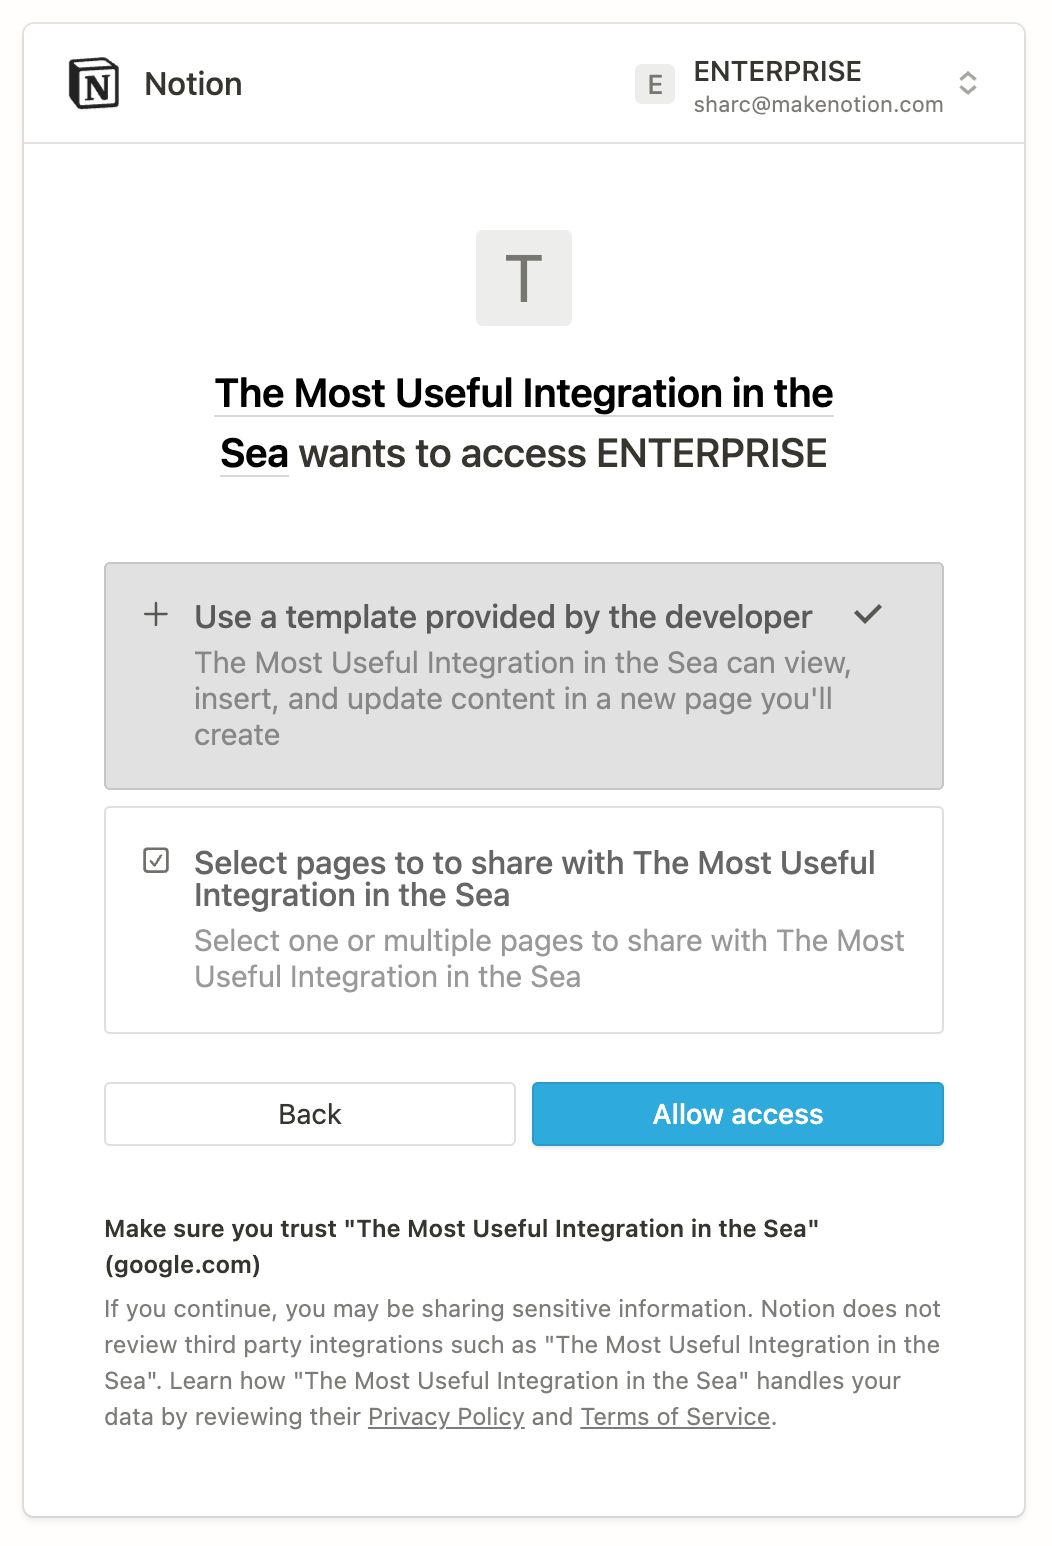
Prompt for a connection with a Notion template option
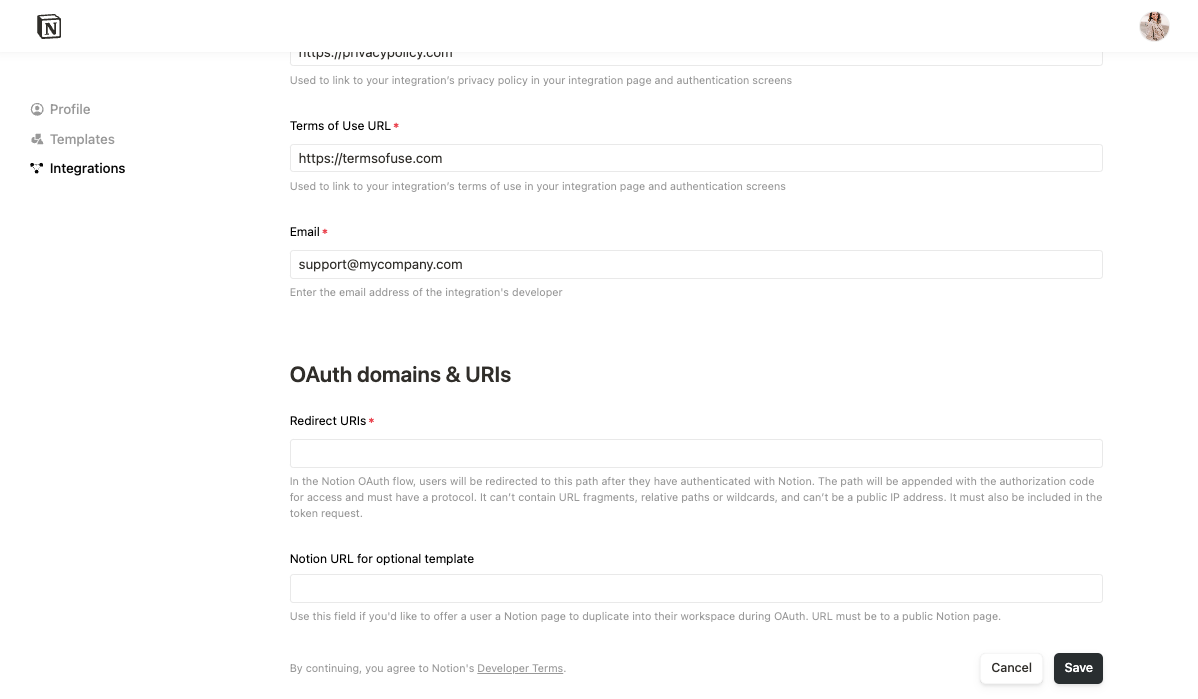
Public connections offer the option of providing a public Notion page to use as a template during the auth flow. To add a template to your workspace, complete the following steps:- Choose a public page in your workspace that you want users to be able to duplicate.
- Navigate to your connection in the Developer portal and open the Configuration tab, then scroll to the Basic information section.
- Scroll to the bottom of your distribution settings and add the URL of the Notion page you selected to the Notion URL for optional template input.
Next.
- The connection is added to the user’s workspace.
- The template is duplicated as a new page in the workspace.
- The new page is shared with the connection.
After a user authorizes a public connection, only that user is able to interact or share pages and databases with the connection. Unlike internal connections, if multiple members in a workspace want to use a public connection, each prospective user needs to individually follow the auth flow for the connection.
Cancel the request, then a failure is triggered. Build your connection to handle these cases gracefully, as needed.
In some cases, Notion redirects the user to the redirect_uri that you set up when you created the public connection, along with an error query parameter. Notion uses the common error codes in the OAuth specification. Use the error code to create a helpful prompt for the user when they’re redirected here.
Step 2 - Notion redirects the user to the connection’s redirect URI and includes a code parameter
When you first created the public connection, you specified a redirect URI. If the user follows the prompt to Allow access for the connection, then Notion generates a temporary code and sends a request to the redirect URI with the following information in the query string:
| Parameter | Description | Required |
|---|---|---|
code | A temporary authorization code. | ✅ |
state | The value provided by the connection when the user was prompted for access. |
code query parameter provided in the redirect. The retrieval method varies depending on your app’s tech stack.
In a React component, for example, the query parameters are made available through the useRouter() hook:
Step 3 - Send the code in a POST request to the Notion API
The connection needs to exchange the temporary code for an access_token.
To set up this step, retrieve the code from the redirect URI.
Next, send the code as part of a POST request to Notion’s token endpoint: https://api.notion.com/v1/oauth/token.
This endpoint is described in more detail in the API reference docs for creating a token.
The request is authorized using HTTP Basic Authentication. The credential is a colon-delimited combination of the connection’s CLIENT_ID and CLIENT_SECRET, like so:
base64 encoded before being added to the Authorization header.
The body of the request contains the following JSON-encoded fields:
| Field | Type | Description | Required |
|---|---|---|---|
"grant_type" | string | Always use "authorization_code". | ✅ |
"code" | string | The temporary authorization code received in the incoming request to the "redirect_uri". | ✅ |
"redirect_uri" | string | The "redirect_uri" that was provided in the Authorization step. | ✅/❌* * If the redirect URI was supplied as a query param in the Authorization URL, this field is required. If there are more than one redirect URIs included in your connection settings, this field is required. Otherwise, it is not allowed. Learn more in the Create a token page. |
Step 4 - Notion responds with an access_token , refresh_token, and additional information
Notion responds to the request with an access_token, refresh_token, and additional information. The access_token will be used to authenticate subsequent Notion REST API requests. The refresh_token will be used to refresh the access token, which generates a new access_token.
The response contains the following JSON-encoded fields:
| Field | Type | Description | Not null |
|---|---|---|---|
"access_token" | string | An access token used to authorize requests to the Notion API. | ✅ |
"refresh_token" | string | A refresh token used to generate a new access token | ✅ |
"bot_id" | string | An identifier for this authorization. | ✅ |
"duplicated_template_id" | string | The ID of the new page created in the user’s workspace. The new page is a duplicate of the template that the developer provided with the connection. If the developer didn’t provide a template for the connection, then the value is null. | |
"owner" | object | An object containing information about who can view and share this connection. A user object is returned, representing the user who authorized the connection. | ✅ |
"workspace_icon" | string | A URL to an image that can be used to display this authorization in the UI. | |
"workspace_id" | string | The ID of the workspace where this authorization took place. | ✅ |
"workspace_name" | string | A human-readable name that can be used to display this authorization in the UI. |
code for an access_token, then the response contains a JSON-encoded body with an "error" field. Notion uses the common error codes from the OAuth specification.
Step 5 - The connection stores the access_token and refresh_token for future requests
Set up a way for your connection to store both the access_token and refresh_token that it receives. The access_token is used to make authorized requests to the Notion API, and the refresh_token is used to generate a new access_token.
Tips for storing and using token access
- Setting up a database is a typical solution for storing access tokens. If you’re using a database, then build relations between an
access_token,refresh_token, and the corresponding Notion resources that your connection accesses with that token. For example, if you store a Notion database or page ID, relate those records with the correctaccess_tokenthat you use to authorize requests to read or write to that database or page, and therefresh_tokenfor ongoing token lifecycle support.. - Store all of the information that your connection receives with the
access_tokenandrefresh_token. You never know when your UI or product requirements might change and you’ll need this data. It’s really hard (or impossible) to send users to repeat the authorization flow to generate the information again. - The
bot_idreturned along with your tokens identifies the Notion bot for the authorization. Store the token pair from each successful authorization response. This includes re-authorization of the same connection, where Notion may return a newaccess_tokenandrefresh_token.
Step 6 - Refreshing an access token
Refreshing an access token will generate a new access token and a new refresh token. Send therefresh_token provided from Step 4 as part of a POST request to Notion’s token endpoint: https://api.notion.com/v1/oauth/token.
This endpoint is described in more detail in the API reference docs for refreshing a token.
The request is authorized using HTTP Basic Authentication. The credential is a colon-delimited combination of the connection’s CLIENT_ID and CLIENT_SECRET, like so:
base64 encoded before being added to the Authorization header.
The body of the request contains the following JSON-encoded fields:
| Field | Type | Description | Required |
|---|---|---|---|
"grant_type" | string | Always use "refresh_token". | ✅ |
"refresh_token" | string | The "refresh_token" returned in the Authorization step. | ✅ |
refresh_token for a new access token and new refresh token