> ## Documentation Index
> Fetch the complete documentation index at: https://developers.notion.com/llms.txt
> Use this file to discover all available pages before exploring further.
# Internal connections
> Learn how internal connections work, how permissions are managed, and how to create one.
export const developerConnectionsUrl = "https://app.notion.com/developers/connections";
## What is an internal connection?
An internal connection is scoped to a single Notion workspace. Only members of that workspace can use it. Internal connections are ideal for team-owned automations and workflows — things like syncing data from external tools, sending notifications when pages change, or powering internal dashboards.
Internal connections use a static API token for authentication. There's no OAuth flow to implement — you get a token immediately when you create the connection, and you use that same token for every API request.
If you want a token that acts as your own Notion user for a script, CLI workflow, Worker, or trusted tool, use a [personal access token](/guides/get-started/personal-access-tokens) instead. PATs use the creator's page permissions instead of a separate bot's page permissions.
In this guide, you'll learn:
* How internal connection permissions work (and how they differ from public connections)
* How to create an internal connection and share pages with it
* How to authenticate API requests using your installation access token
## How permissions work
An internal connection operates as its own **bot user**. It is not tied to any specific workspace member. This means:
* **Permissions belong to the connection, not to a person.** When a page is shared with the connection, the connection itself has access — regardless of which workspace member shared it.
* **Access is inherited.** Sharing a parent page with the connection grants access to all of its child pages as well.
* **Access persists independently of users.** If the user who shared a page leaves the workspace, the connection retains access to that page.
* **Any Workspace Owner can see the connection.** All internal connections are visible in the Developer portal to every Workspace Owner in the workspace, including connections created by others.
This is one of the biggest differences from [public connections](/guides/get-started/public-connections), where the connection acts on behalf of the individual user who authorized it, and [personal access tokens](/guides/get-started/personal-access-tokens), which act as the user who created the token.
## Creating an internal connection
You must be a [Workspace Owner](https://www.notion.so/help/add-members-admins-guests-and-groups) to create a connection.
Navigate to the Developer portal.
In the **Build** section of the sidebar, select **Internal connections**.
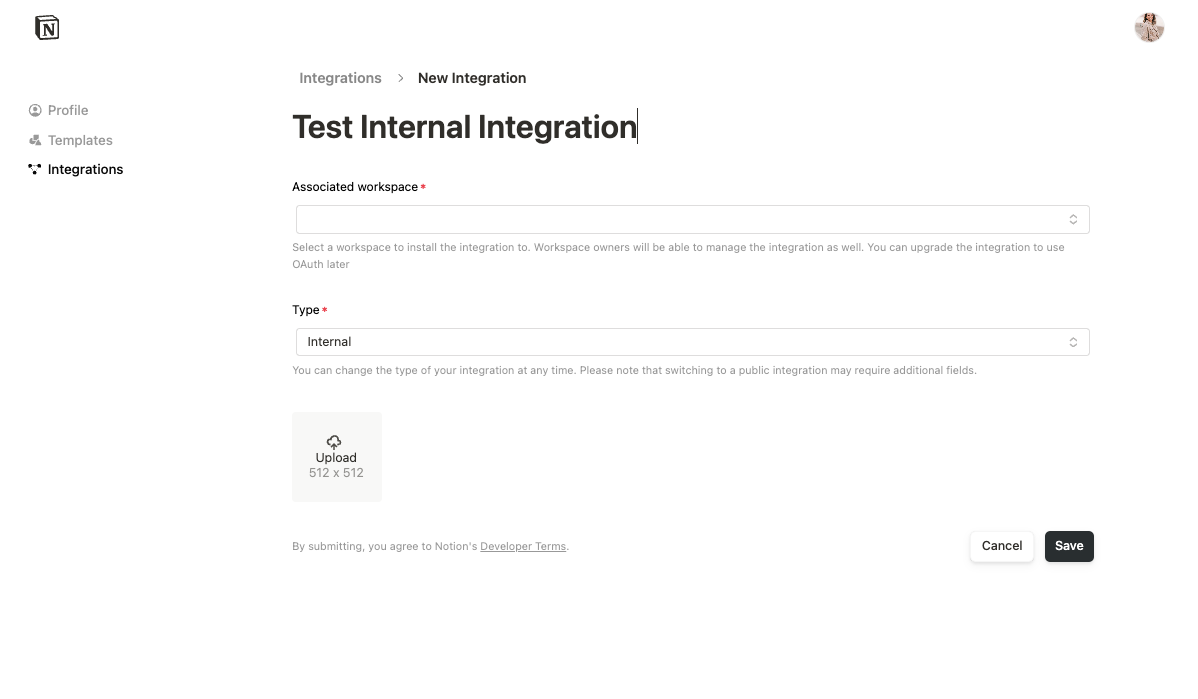
Click **Create a new connection**, enter a connection name, and choose the workspace where the connection can be installed.
 After creation, visit the **Configuration** tab to retrieve your **Installation access token**.
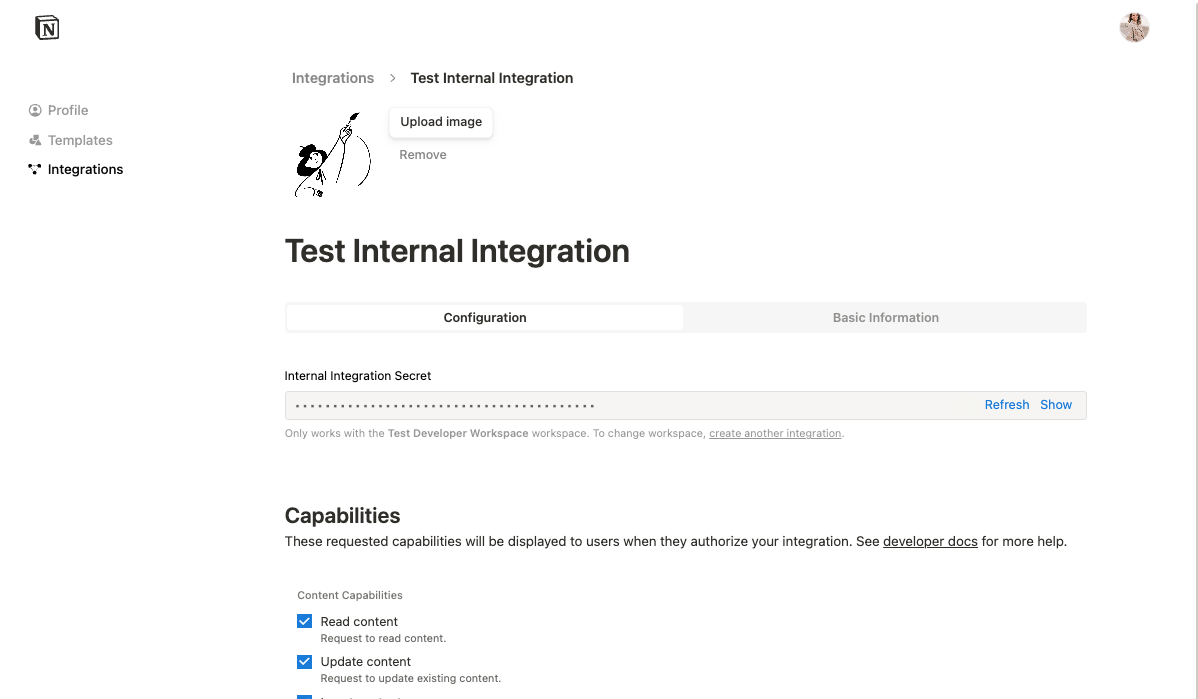 You can also configure the connection's [capabilities](/reference/capabilities) — such as whether it can read content, update content, insert content, or read user information — from the **Configuration** tab.
## Granting page access
Before your connection can access any data, it must be explicitly granted access to pages or databases. There are two ways to do this.
### From the Developer portal
The connection owner can manage access directly from the **Content access** tab in the Developer portal. This is the quickest way to get started after creating a connection.
Open your connection in the Developer portal.
Click the **Content access** tab.
Click **Edit access**, then select the pages and databases you want the connection to access.
### From the Notion UI
Workspace members can also share individual pages with the connection from within Notion.
Open a Notion page you want the connection to access.
Click the **•••** menu in the top-right corner of the page.
Select **Connections**, then click **+ Add connection**.
Search for your connection and select it.
Confirm the connection can access the page and all of its child pages.
**Your connection needs page access to make API requests**
A newly created connection has no page access by default. If you skip this step, any API request will return an error. Use the **Content access** tab or **Add connections** menu to grant access before making requests.
## Authentication
Internal connections authenticate every API request using the API token retrieved from the **Configuration** tab. Include the token in the `Authorization` header:
```http HTTP theme={null}
GET /v1/pages/b55c9c91-384d-452b-81db-d1ef79372b75 HTTP/1.1
Authorization: Bearer {INTEGRATION_TOKEN}
```
If you're using the [Notion SDK for JavaScript](https://github.com/makenotion/notion-sdk-js), the token is set once when initializing the client:
```javascript JavaScript theme={null}
const { Client } = require("@notionhq/client")
const notion = new Client({
auth: process.env.NOTION_TOKEN,
})
```
**Keep your token secret.** Never store the token in source code or commit it to version control. Use environment variables or a secret manager instead. If your token is accidentally exposed, you can refresh it from the connection's **Configuration** tab.
[Learn more: Best practices for handling API keys](/guides/get-started/handling-api-keys)
For the full details on internal connection authentication, see the [Authorization guide](/guides/get-started/authorization#internal-connection-auth-flow-set-up).
## Next steps
Build your first connection with a hands-on tutorial.
Explore all available endpoints.
You can also configure the connection's [capabilities](/reference/capabilities) — such as whether it can read content, update content, insert content, or read user information — from the **Configuration** tab.
## Granting page access
Before your connection can access any data, it must be explicitly granted access to pages or databases. There are two ways to do this.
### From the Developer portal
The connection owner can manage access directly from the **Content access** tab in the Developer portal. This is the quickest way to get started after creating a connection.
Open your connection in the Developer portal.
Click the **Content access** tab.
Click **Edit access**, then select the pages and databases you want the connection to access.
### From the Notion UI
Workspace members can also share individual pages with the connection from within Notion.
Open a Notion page you want the connection to access.
Click the **•••** menu in the top-right corner of the page.
Select **Connections**, then click **+ Add connection**.
Search for your connection and select it.
Confirm the connection can access the page and all of its child pages.
**Your connection needs page access to make API requests**
A newly created connection has no page access by default. If you skip this step, any API request will return an error. Use the **Content access** tab or **Add connections** menu to grant access before making requests.
## Authentication
Internal connections authenticate every API request using the API token retrieved from the **Configuration** tab. Include the token in the `Authorization` header:
```http HTTP theme={null}
GET /v1/pages/b55c9c91-384d-452b-81db-d1ef79372b75 HTTP/1.1
Authorization: Bearer {INTEGRATION_TOKEN}
```
If you're using the [Notion SDK for JavaScript](https://github.com/makenotion/notion-sdk-js), the token is set once when initializing the client:
```javascript JavaScript theme={null}
const { Client } = require("@notionhq/client")
const notion = new Client({
auth: process.env.NOTION_TOKEN,
})
```
**Keep your token secret.** Never store the token in source code or commit it to version control. Use environment variables or a secret manager instead. If your token is accidentally exposed, you can refresh it from the connection's **Configuration** tab.
[Learn more: Best practices for handling API keys](/guides/get-started/handling-api-keys)
For the full details on internal connection authentication, see the [Authorization guide](/guides/get-started/authorization#internal-connection-auth-flow-set-up).
## Next steps
Build your first connection with a hands-on tutorial.
Explore all available endpoints.